Advertising Disclosure: This site may receive compensation for service connections made through this page. Content is editorially independent.
If your AC is coming out of winter and you noticed weak airflow, odd smells, or it just isn't cooling right yet, the safe homeowner spring-prep list is narrow: replace the air filter, flush the condensate drain with vinegar, and clear loose debris from around (not touching) the outdoor unit. Everything else in this guide — coil cleaning, refrigerant pressure check, capacitor test, temperature-split measurement — is what a technician performs during a professional tune-up. Do not kill the power by going to your service panel to flip the breaker yourself, do not open the outdoor cabinet, and do not operate the outdoor disconnect. Refrigerant work is federally regulated under EPA Section 608 and certification is legally required.
If your AC has been sitting through winter and you noticed weak airflow, odd smells, or an unusual sound the first time it ran this season, the safe homeowner spring-prep list is narrow but specific. Complete 7 spring AC prep steps in March or April before the first 80°F day: replace the filter, rinse the outdoor condenser, flush the condensate drain, check refrigerant line insulation, test the system, update thermostat settings, and schedule a professional tune-up ($80–$160). A spring tune-up prevents the most common first-hot-day failures and avoids summer emergency premiums.
The most common time for a central air conditioner to fail is the first hot weekend of summer — a day when temperatures spike into the 90s, every HVAC company in the area is already dispatching emergency calls, and a same-day appointment is either unavailable or priced at an emergency premium. The system that worked fine the previous September has sat dormant through fall and winter. Capacitors degrade, condensate drains develop algae clogs, and condenser coils collect a season's worth of debris. On the first truly hot day, these minor issues become system failures.
Spending an hour in March or April on these 7 steps — most of which require no special tools — addresses the most common causes of first-heat-wave failures before they can strand your household without cooling.
Why Should I Service My AC in Spring, Not Summer?
March and April represent a narrow window where several conditions align in your favor:
- HVAC technicians are available at normal rates. By mid-May in most markets, HVAC companies begin seeing their first cooling-season surge. Emergency dispatch slots fill up and some companies begin charging seasonal premiums. A March tune-up appointment is booked at normal pricing, often within a few days.
- You can test the system without actually needing it. On a mild spring day, you can run the AC to verify it works — and if it does not, you have days or weeks to schedule a repair before the heat forces your hand. Discovering a failed capacitor in April means a routine repair call at your convenience. Discovering it during a July heat wave means an emergency call at twice the price, if you can get someone that day at all.
- Condensate drain clogs are easier to clear before season. Algae and mold that grew in the drain line over winter are easier to flush out in spring before the system starts running continuously and backs up into the drain pan — which, if not caught, overflows onto your ceiling or floor.
- Efficiency improvements compound over the season. A clean condenser coil, a fresh filter, and properly insulated refrigerant lines each contribute a small efficiency gain. Over three months of continuous summer operation, those small gains add up to measurable savings on your electricity bill.
In Texas, Florida, Arizona, and the Southeast, cooling season can arrive in earnest by late March or early April. If you live in a climate where you run the AC before Memorial Day, move your spring prep to February — the logic is the same but the timeline is compressed.
What Does a Spring AC Prep Schedule Look Like?
| Step | Best Timing | DIY or Pro | Time Required |
|---|---|---|---|
| Replace air filter | Before first use | DIY | 5 minutes |
| Clean outdoor condenser unit | March–April | DIY | 20–30 minutes |
| Clear condensate drain line | March–April | DIY | 15 minutes |
| Inspect refrigerant line insulation | March–April | DIY | 10 minutes |
| Test system on mild day | When outdoor temp >60°F | DIY | 20 minutes |
| Update thermostat settings | Before cooling season | DIY | 10 minutes |
| Professional tune-up | March–April (book early) | Pro | 1–2 hours |
1. Replace the Air Filter
Start every cooling season with a fresh air filter — regardless of when the last one was installed. A filter that has been in place since late fall has collected debris from heating season. If you run a gas furnace through the filter, the same filter handles cooling too, and it has been collecting dust for months.
A clogged filter at the start of cooling season has two direct consequences. First, restricted airflow starves the evaporator coil of the warm return air it needs to absorb heat — the coil gets too cold, the condensate on its surface freezes, and the frozen coil blocks airflow entirely. A frozen evaporator coil is one of the most common early-season service calls, and in most cases it is caused by a dirty filter or blocked return vents. Second, a clogged filter forces the blower motor to work harder, increasing its electricity draw and accelerating bearing wear.
For standard 1-inch pleated filters, replace at the start of each season and plan to check monthly through the summer. Homes with pets or allergy sufferers often need replacement every 30 days during peak cooling season. Write the installation date on the filter's cardboard frame so you always know how old it is.
Higher-MERV filters (13+) capture smaller particles but restrict airflow more than lower-MERV options. Many residential systems are not designed for MERV 13+ and will struggle to pull adequate airflow through them. MERV 8–11 is the correct range for most homes — good filtration without restricting the system. Check your system's documentation or ask your HVAC technician what rating is appropriate for your specific air handler.
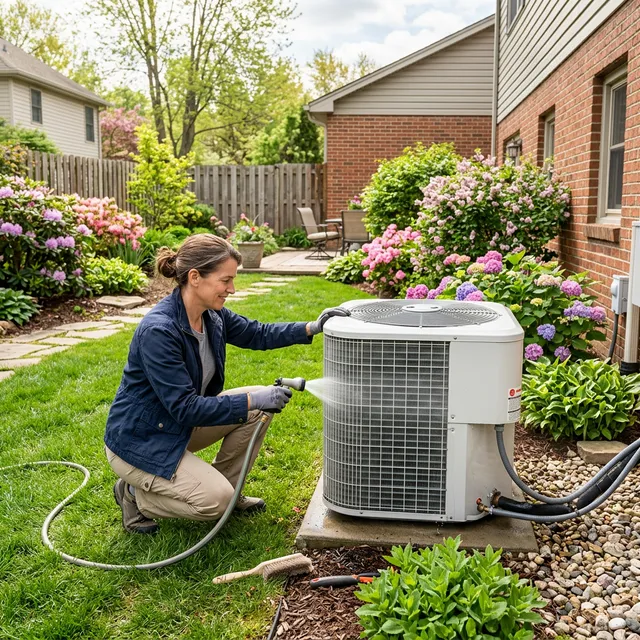
2. Have a Technician Clean the Outdoor Condenser Unit
The outdoor condenser unit has spent the winter collecting leaves, dirt, cottonwood seeds, dead grass, and whatever else the weather brought. The condenser coil — the fins wrapped around the outside of the unit — is how your system dumps heat to the outdoor air. A dirty coil means the system has to work harder and run longer to move the same amount of heat, raising your electricity bill and straining the compressor.
Coil cleaning is a technician task, not a DIY project. The outdoor cabinet contains 240V wiring that remains live even with the breaker off, and proper cleaning often requires chemical coil cleaner, a fin comb, and a pressure inspection. The technician will shut off power at the disconnect, inspect for pest damage or fin bending, apply the correct cleaner, and rinse the coil at the correct pressure — steps that are unsafe for a homeowner to attempt because they require opening access panels.
What you can safely do as a homeowner before the visit:
- Clear loose debris from around (not touching) the outdoor unit. Remove leaves, branches, and stored items within a 2-foot radius. This reduces the restriction on airflow. Do not spray the unit with water. Do not touch the outdoor disconnect. Do not open the cabinet or the top grille.
- Book a spring tune-up instead of attempting coil cleaning yourself. A professional tune-up typically includes coil cleaning, fin inspection, refrigerant pressure check, capacitor test, and condensate drain flush — several of which require credentials the homeowner should not provide. The $80—$160 tune-up cost is almost always lower than the damage a mis-done DIY cleaning creates.
Most central AC systems are not designed to operate when outdoor temperatures are below 60°F. Running the system in cold conditions can cause the refrigerant to behave incorrectly, damaging the compressor. When testing in spring, choose a mild day with outdoor temperatures clearly above 60°F.
3. Clear the Condensate Drain Line
When your AC removes humidity from indoor air, the moisture condenses on the evaporator coil and drips into a drain pan, then flows out through a condensate drain line — typically a white PVC pipe that exits near the air handler and drains to a floor drain, outside, or into a condensate pump. Over winter (and throughout a wet cooling season), algae and mold grow inside the drain line. The warm, moist, dark environment is ideal for biological growth, and it can reduce the line's flow rate enough to cause a backup.
A backed-up condensate drain overflows the drain pan. In attic air handlers, that water falls through the ceiling. In basement or closet units, it puddles on the floor. Modern systems have a float switch in the drain pan that shuts down the system when water reaches a certain level — but by then, the water has already backed up significantly.
Spring flushing takes 15 minutes and can prevent this entirely:
- Locate the condensate drain clean-out — usually a T-shaped fitting with a removable cap on the PVC pipe near the air handler.
- Pour one cup of distilled white vinegar into the clean-out. Vinegar is acidic enough to kill algae and mild enough not to damage the PVC.
- Wait 30 minutes, then flush with a cup of clean water.
- Check the drain outlet (outside or at the floor drain) to confirm water is flowing freely.
If the line is already blocked, suction is more effective than pressure. Use a wet/dry vacuum on the drain outlet end — seal it around the pipe opening and run the vac for 2–3 minutes. This usually clears biological clogs completely. If the line remains blocked, a technician can use nitrogen to blow it clear or identify a broken section of pipe.
Connect with a local independent HVAC technician before summer demand peaks. Spring appointments are faster, cheaper, and easier to schedule.
Call Now — (844) 582-1795Disclosure: We are a referral service and may receive compensation for qualified calls. Calls may be routed to an independent provider network and may be recorded. Pricing and availability vary by provider and location.
4. Inspect Refrigerant Line Insulation
Two refrigerant lines run between your outdoor condenser unit and the indoor air handler — a smaller liquid line and a larger suction line. The suction line carries cold, low-pressure refrigerant vapor back to the compressor and must be insulated to prevent it from absorbing heat from the surrounding air before it reaches the compressor. Proper insulation also prevents the line from sweating (condensing moisture from the air), which can damage walls, ceilings, and the line itself over time.
From a safe distance (not touching the lines, not approaching the outdoor cabinet), note whether you can see:
- Sections where the foam insulation has visibly cracked, collapsed, or fallen away
- Gaps at fittings and joints where insulation has shrunk back
- Discoloration or moisture staining on walls or ceilings below where the lines run
Foam insulation replacement on refrigerant lines is a technician task — the foam wraps pressurized refrigerant lines that sit alongside live electrical components at the outdoor cabinet. Mention any damage you notice to the technician at the spring tune-up so they can replace it during the visit. Do not attempt to wrap or replace the foam yourself.
5. What a Technician Tests During the Spring Tune-Up
A professional spring tune-up includes a comprehensive system test you should not attempt to do yourself. The technician has the tools, training, and access privileges to safely measure refrigerant pressures, temperature split, amperage draw, and other diagnostics that require opening the outdoor cabinet or working near live components.
Here is what the technician will check so you can confirm they are doing the job thoroughly:
- Thermostat cool-mode startup. Set to Cool, lowered 5°F below indoor temp. The outdoor unit should start within 60–90 seconds.
- Temperature split (Delta T) measurement. The technician uses calibrated probes at the supply vent and return grille. A healthy system delivers a 15–22°F split after 15–20 minutes. Low Delta T points to refrigerant, airflow, or coil problems; high Delta T points to severe airflow restriction. Do not try to measure this yourself — a consumer thermometer at a register is not reliable and exceeds the homeowner-DIY cap.
- Refrigerant pressure gauges. High-side and low-side readings confirm charge level without needing to physically feel the lines.
- Capacitor microfarad test. A multimeter at the outdoor cabinet (after the technician shuts off power at the disconnect and safely drains the capacitor) confirms whether the capacitor is within 10% of rated value.
- Compressor and fan motor amp draw. A clamp meter on the leads verifies each motor is within spec.
- Coil inspection and cleaning. Only accessible with the cabinet open — never a homeowner task.
What a homeowner can safely notice without approaching the unit: whether the system sounds "different" than last year (new rattles or grinding heard from inside the house), whether supply air smells persistently musty (suggests coil biofilm), and whether the system takes noticeably longer to reach set point than it did last summer. Describe what you observed; let the technician diagnose.
Ice forming on the refrigerant lines or on the outdoor unit while the AC is running is not normal and indicates a serious problem — typically low refrigerant or severely restricted airflow. Running a frozen system forces the compressor to work in conditions it was not designed for and can cause permanent compressor damage. Turn the system off immediately, let it thaw completely (usually 2–4 hours), and call a technician before running it again.
6. Update Thermostat Settings for Cooling Season
Before the heat arrives, take 10 minutes to verify your thermostat is configured correctly for cooling season. This is especially easy to overlook on programmable and smart thermostats that have separate schedules for heating and cooling.
- Switch from Heat to Cool (or Auto). Many programmable thermostats require manually switching the system mode. If left in Heat mode, the thermostat will not activate the AC regardless of temperature.
- Update the programmed schedule. Summer occupancy patterns are different from winter ones — work-from-home days, vacation weeks, different wake and sleep times. Update the schedule now so you are not running the AC on a heating-season program that doesn't match your actual summer routine.
- Set the correct temperature targets. The U.S. Department of Energy recommends 78°F when home and awake, and 85°F when away or asleep, for cooling-season efficiency. Every degree lower than 78°F increases cooling energy use by approximately 3%. For households with heat-sensitive members, set comfort as the priority — but know the efficiency trade-off.
- Verify smart thermostat settings. If you have a smart thermostat, confirm that geofencing and occupancy detection are functioning correctly. Some smart thermostats require a seasonal recalibration period to relearn home cooling patterns. Check the app for any system alerts or recommended settings adjustments.
7. Schedule a Professional AC Tune-Up
The DIY steps above address what you can see and access. A professional tune-up covers everything else — and the "everything else" is where the most consequential problems hide.
Here is what a thorough professional AC tune-up should include:
- Refrigerant level check and leak inspection: Low refrigerant is one of the most common causes of reduced cooling capacity. Checking and topping off refrigerant requires an EPA 608 certification — this is not a DIY task. More importantly, a technician will check why the level is low, since refrigerant does not simply "run out" — low refrigerant means there is a leak that needs to be located and repaired before recharging.
- Capacitor and contactor testing: The run capacitor stores electrical charge that helps start and run the compressor and fan motors. Capacitors degrade over time — measuring capacitance with a multimeter identifies ones that are still functional but near failure. A $15—$25 capacitor replaced during a spring tune-up prevents a $250—$400 emergency call in July. The contactor (an electrical relay) is checked for pitting and arcing.
- Evaporator coil inspection and cleaning: The indoor evaporator coil can develop mold and debris accumulation that restricts airflow and creates a musty odor. A technician cleans it with a foaming coil cleaner that cuts through biological buildup without damaging the fins.
- Electrical connection check: Loose wiring connections cause resistance and heat. Tightening connections during a tune-up is standard practice and prevents failures caused by arcing or overheated terminals.
- Blower motor and belt inspection: The technician checks blower motor amperage draw (elevated draw means a struggling motor), checks bearings, and lubricates as needed.
- Delta T measurement: A properly functioning system should produce a 15–22°F temperature differential between supply and return air. If Delta T falls outside this range, the technician can identify the cause — low refrigerant, dirty coil, or airflow restriction.
A professional AC tune-up typically costs $80—$160 and takes 1–2 hours. It is worth doing every 1–2 years. For a system that is 8–12 years old and approaching replacement territory, a tune-up also gives you a professional assessment of remaining system life — useful if you are deciding whether to invest in repairs or plan for replacement. See our guide to refrigerant costs and regulations if your system uses R-22 or R-410A refrigerant.
How Much Does a Spring Tune-Up Save vs. Summer Emergency?
The math on preventative maintenance is straightforward. Here is what the same set of problems costs when caught in spring versus when they fail mid-summer:
| Problem | Spring Repair Cost | Summer Emergency Cost | Difference |
|---|---|---|---|
| Failing capacitor (caught in tune-up) | $80—$200 | $200—$450 + emergency fee | +$150—$300 |
| Low refrigerant (found during check) | $150—$400 | $300—$600 + emergency fee | +$150—$300 |
| Condensate drain clog (flushed in spring) | $0 (DIY) or $75—$150 (pro) | $100—$250 + potential water damage | +$100 to $1,000+ |
| Professional tune-up (preventative) | $80—$160 | Not applicable | Saves $200—$600 on average |
| After-hours emergency dispatch fee | Not applicable | +$75—$200 | Avoided entirely |
The spring tune-up pays for itself if it catches even one failing capacitor. And in a system that is 7–15 years old, a capacitor near the end of its service life is more the rule than the exception.
If you are weighing repair costs against system replacement for an older AC unit, see our guide to summer AC repairs and warning signs for a breakdown of what each common repair actually costs.
Spring availability fills up fast. Get connected with a local independent HVAC provider now — before the summer rush makes scheduling difficult.
Call Now — (844) 582-1795Disclosure: We are a referral service and may receive compensation for qualified calls. Calls may be routed to an independent provider network and may be recorded. Pricing and availability vary by provider and location.
Frequently Asked Questions
March through April is ideal in most of the U.S. — temperatures are mild enough that you can test the system without needing it for comfort, and HVAC technicians are not yet slammed with summer emergency calls. In the South and Southwest (Texas, Florida, Arizona, Georgia), push that window to late February or March since cooling season arrives earlier. The goal is to be fully prepared before the first stretch of consistent 80°F+ days.
A homeowner can safely replace the air filter, clear loose debris from around (not touching) the outdoor unit, flush the condensate drain line with vinegar, and turn the thermostat to cooling mode to test it. Everything else — coil cleaning, refrigerant handling, electrical testing, fin work, anything that requires opening the outdoor cabinet or the service panel — is a technician task. A professional spring tune-up ($80–$160) is the safe, correct way to prep the system every year.
A standard professional tune-up includes: refrigerant level check and leak inspection, capacitor and contactor condition testing, evaporator and condenser coil inspection and cleaning, electrical connection tightening, blower motor amperage check and lubrication, thermostat calibration verification, and Delta T measurement. A good technician will also note anything approaching end of service life so you can plan — rather than be surprised — by upcoming repairs.
Common signs include the system running longer than usual without reaching the set temperature, warm air from supply vents when the AC is running, ice forming on the refrigerant lines or evaporator coil, a hissing or bubbling sound near the unit, or a noticeable increase in your electricity bill without a change in usage. If you notice any of these, turn the system off and call a technician — a refrigerant leak must be found and repaired before recharging. Simply adding refrigerant without fixing the leak is a temporary and expensive non-fix.
For standard 1-inch pleated MERV 8–11 filters, every 60–90 days is the baseline — but check it monthly during peak cooling season. Homes with pets, allergy sufferers, or high occupancy may need monthly replacement. Thicker 4-to-5-inch whole-house media filters are rated for 6-12 months by major manufacturers (Aprilaire, Honeywell, 3M Filtrete spec sheets). The simple rule: if the filter looks gray and dense when you pull it out, replace it regardless of how long it has been installed.
Local HVAC Service Areas
Cool Call Pro connects homeowners with independent HVAC technicians nationwide. Find a pro in San Antonio (TX), Birmingham (AL), New Orleans (LA), or your city. Browse state HVAC guides: Texas, Alabama, and Louisiana.
