Advertising Disclosure: This site may receive compensation for service connections made through this page. Content is editorially independent.
Most items on this fall-prep walkthrough describe what a qualified technician performs during a pre-winter tune-up — they are not DIY instructions. The homeowner-safe list is narrow: replace the air filter, change batteries in CO detectors, clear loose debris from around (not touching) the outdoor unit. Do not kill the power by going to your service panel to flip the breaker to inspect the furnace yourself, do not open the access panels on the furnace or the outdoor unit, and do not touch the heat exchanger, burners, igniter, or refrigerant lines. Refrigerant work is federally regulated under EPA Section 608 and certification is legally required.
Most winter furnace failures happen during the first freeze. Complete 9 fall prep steps in September–October: schedule a tune-up, replace the filter, test the thermostat, replace CO detector batteries, inspect ductwork, clear the outdoor unit, seal air leaks, check your emergency heat source, and locate gas/electrical shutoffs. Booking early means shorter waits and lower rates before peak demand hits.
Most winter furnace failures happen during the first freeze of the season. After sitting idle for five or six months, a furnace is suddenly commanded to run at full capacity in conditions it has not seen since last February. If there is a failing igniter, a clogged burner, a cracked heat exchanger, or a dead capacitor waiting to announce itself, it will do so on the coldest night of the year — when your HVAC provider's dispatch queue is longest and emergency fees are highest.
Spending 20–30 minutes in early fall addressing these 9 steps can prevent breakdowns, lower energy bills, protect your family from CO exposure, and extend the life of your system. Industry data consistently suggests that over 75% of no-heat emergency calls in November and December could have been prevented with basic pre-season maintenance.
Why Is Fall the Most Important Season for HVAC?
Understanding why fall matters helps explain why procrastinating to November is a costly mistake:
- Thermal shock on first startup: After months of inactivity, the furnace burner assembly, heat exchanger, and blower motor all experience sudden thermal and mechanical stress. If a component was borderline at the end of last winter, this first startup is often when it finally fails.
- HVAC technician availability collapses in November: By the time the first hard freeze arrives, HVAC companies are booking days — sometimes weeks — out. Emergency dispatch fees often add $100—$300 to any repair bill. Scheduling in September or early October means you get routine pricing and same-week availability.
- CO risk spikes in winter: Furnaces that have developed hairline heat exchanger cracks over summer sit dormant until heating season. When they start running again, those cracks begin leaking CO into your home's airstream — and the house is sealed up tight against the cold, concentrating the gas. Fall inspection catches this before the heating season begins.
- Duct leaks hidden in summer become expensive in winter: A 20% efficiency loss from leaky ductwork costs a relatively modest amount during mild shoulder-season temperatures. That same leak during a month of continuous cold-weather operation significantly inflates your energy bills.
When Should I Complete Each Fall HVAC Step?
Not all fall prep needs to happen simultaneously. Here is a practical timing guide:
| Step | Best Timing | DIY or Pro | Priority |
|---|---|---|---|
| Schedule professional tune-up | September — early October | Pro | Critical |
| Replace air filter | Before first use | DIY | Critical |
| Test thermostat on a mild day | September | DIY | High |
| Replace CO detector batteries + check expiration | October | DIY | Critical (safety) |
| Inspect visible ductwork | September — October | DIY (minor sealing); Pro (major leaks) | High |
| Clear outdoor unit | After leaves fall | DIY | Medium |
| Seal air leaks, weatherstripping | October–November | DIY | High (energy savings) |
| Check emergency heat source | October | DIY | High |
| Locate and label shutoffs | Any time | DIY | High (emergency preparedness) |
1. Schedule the Professional Tune-Up Early
This is the most important step and the one most homeowners delay until it is too late. Schedule in September or early October — not November. Here is what a qualified technician should do during a fall furnace tune-up:
- Combustion analysis: A calibrated probe inserted into the flue measures the actual gases coming out of the furnace during burner operation. A properly functioning gas furnace should produce essentially zero CO in its exhaust. Elevated readings indicate incomplete combustion or a compromised heat exchanger.
- Heat exchanger inspection: The technician uses a smoke pencil test, combustion probe, and possibly a flexible inspection camera to look for cracks that are invisible to the naked eye. A cracked heat exchanger is a CO safety emergency. See our carbon monoxide guide for full details.
- Burner cleaning and inspection: Dirt and debris accumulate on burner ports over the off-season, causing uneven flame patterns and incomplete combustion. Clean burners produce a steady blue flame; dirty ones show yellow or orange flame patterns.
- Igniter check: Hot surface igniters are ceramic elements that glow to ignite the gas. They degrade over time and can fail without warning. A technician can measure the igniter's electrical resistance to predict whether it is near end of life.
- Flue and exhaust vent inspection: The technician checks the full flue run for corrosion holes, disconnected joints, inadequate slope, and blockages. A blocked flue is one of the primary causes of CO backdrafting.
- Blower motor and belt inspection: The blower motor circulates conditioned air through your ductwork. The technician checks for bearing wear, measures amperage draw (elevated draw indicates a struggling motor), and lubricates the bearings if applicable.
- Electrical connections: Loose wiring connections cause resistance, heat, and arcing that accelerates failure. Tightening connections during a tune-up is inexpensive insurance against electrical component failures mid-winter.
HVAC companies typically see a 3–5x surge in service calls from late October through December. By November, a week-long wait for a non-emergency appointment is common in most markets. A tune-up booked in September is scheduled at your convenience, completed at routine pricing, and any discovered parts are ordered and installed before cold weather arrives.
2. Replace the Air Filter
Start the heating season with a fresh air filter regardless of when the previous one was installed. A filter that has been in place since spring has collected months of airborne dust, pet dander, and debris. When the furnace runs continuously in winter, a partially clogged filter restricts airflow enough to cause the heat exchanger to overheat and trip the high-limit safety switch — shutting down the furnace entirely.
Write the installation date on the filter's cardboard frame with a marker when you install it. Plan to check it monthly through the winter — homes with pets, residents with allergies, or high-use periods may need replacement every 30 days rather than the standard 60–90 days for a pleated MERV 8–11 filter.
If you have a 4–5 inch whole-house media filter in a dedicated filter cabinet, fall is the time to replace that too. These filters are often overlooked because they last 6–12 months and are easy to forget. A clogged media filter restricts airflow across the entire system and can starve the blower motor of the airflow it needs to stay cool.
3. Test Your Thermostat
Do not wait for the first freezing night to discover your thermostat is not communicating properly with the furnace. Test it on a mild fall day when a failure is inconvenient but not dangerous:
- Set the thermostat to Heat mode (not Cool or Auto).
- Raise the set point 3–5°F above the current room temperature.
- The furnace should begin its startup sequence within 60–90 seconds and be blowing warm air within 2–3 minutes.
- If nothing happens: check thermostat batteries, verify the furnace power switch (looks like a light switch on the furnace cabinet wall) is on, and check the circuit breaker.
If you have a programmable thermostat, update the schedule for the heating season. The Department of Energy estimates that homeowners can save approximately 10% per year on heating by setting the thermostat to 68°F when awake and at home, and lowering it 7–10°F while asleep or away. If you have a smart thermostat, verify the geofencing and occupancy settings are configured for your winter routine.
If your thermostat is more than 10–15 years old, consider upgrading to a modern programmable or smart thermostat. The efficiency gains typically pay for the upgrade cost within one to two heating seasons, and modern thermostats offer far more diagnostic information when problems develop.
4. Replace CO Detector Batteries (and Check Expiration)
Before your gas or oil furnace runs for the first time each season, confirm that your carbon monoxide detectors are fully functional. This is a two-step check that many homeowners shortcut:
Step 1 — Replace batteries: Install fresh batteries in every CO detector in your home, even if none have chirped. The test button on the unit tests the alarm circuit and the speaker — it does not test whether the electrochemical sensor inside can actually detect CO gas. Only a fresh battery and a working sensor together protect you.
Step 2 — Check the manufacture date: Flip each CO detector over and look for the manufacture date stamped on the label. If the unit is more than 7 years old, the electrochemical sensor has almost certainly degraded. An expired detector will pass the button test but will not reliably alarm in the presence of CO gas. Replace the entire unit — not just the batteries — if it is 7 or more years old.
For detailed placement guidelines and what to do if an alarm sounds, see our complete carbon monoxide safety guide.
5. Inspect Visible Ductwork
Walk through your basement, attic, and crawl spaces and visually examine any ductwork you can access. Most duct systems have connections that were sealed with mastic compound or aluminum tape at installation — over years, these seals can crack and separate. What to look for:
- Disconnected joints: Sections that have pulled apart, allowing heated air to escape directly into unconditioned spaces. Even a 2–3 inch gap at a joint can lose significant heat before it reaches the living area.
- Crushed or kinked flexible duct: Flex duct in attics often collapses under storage, bends too sharply, or sags severely. Each restriction reduces airflow and forces the furnace blower to work harder.
- Visible holes, tears, or rust: Small gaps can be sealed with aluminum HVAC foil tape (not standard "duct tape," which deteriorates quickly with heat cycles). Larger damage or extensive rust warrants a professional duct evaluation.
- Disconnected supply or return boots: The boot is the transition piece between the duct and the floor/wall register. A loose boot leaks conditioned air into the wall cavity or floor joist bay.
The Department of Energy estimates that duct leakage reduces overall heating efficiency by 20–30% in a typical home. Sealing the most obvious leaks with foil tape is a DIY task that can meaningfully reduce monthly heating costs.
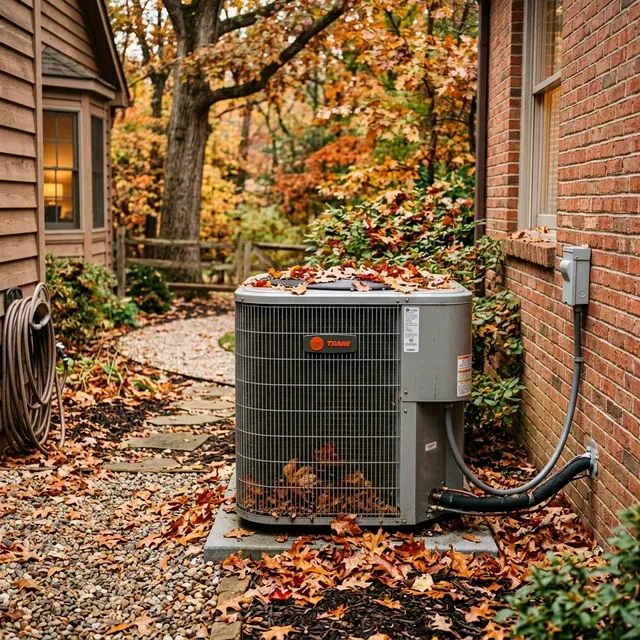
6. Clear and Check the Outdoor Unit
If you have a heat pump or a central AC with an outdoor condenser, clear the area around it after the leaves finish falling. Debris that accumulates through summer and fall can block airflow and, in the case of a heat pump that runs year-round, impair the system's ability to extract heat from cold outdoor air.
- Clear a 2-foot radius of leaves, twigs, seed pods, and encroaching vegetation from all sides of the unit.
- Visually check the condenser fins for bent sections or debris packed into the coil face and note any problems for the technician. Do not attempt to rinse the coil or straighten the fins yourself — the outdoor cabinet contains 240V wiring and these are technician tasks.
- From a safe distance, note whether the foam insulation on the copper lines between the outdoor unit and the house looks cracked or missing. Exposed refrigerant lines lose efficiency and condensation on the suction line can drip and cause water damage where the lines enter the wall — but replacement is a technician task, not a DIY task, because the foam wraps lines that are pressurized with refrigerant and sit alongside live electrical components at the outdoor cabinet. Mention any visible damage to the technician at the fall tune-up.
For a standard central AC (not a heat pump) that will not operate until spring: a partial top cover to deflect falling ice and debris is acceptable, but never fully enclose the unit. Trapped moisture causes corrosion. The unit itself is designed to withstand winter weather uncovered.
For heat pumps: do not cover them. A heat pump runs through winter and requires unrestricted airflow. Instead, keep the clearance zone maintained so defrost cycle drainage and airflow are unobstructed.
7. Seal Air Leaks Around Windows and Doors
Every air leak in the building envelope increases the heat load your furnace must overcome — continuously, all winter. Sealing leaks reduces the furnace's duty cycle, which extends component life and lowers energy bills. The most impactful locations to address:
- Exterior door weatherstripping: Press your hand along the frame of a closed exterior door on a windy day. If you can feel cold air moving, the weatherstripping has compressed or cracked and needs replacement. Self-adhesive foam weatherstripping is inexpensive and a 30-minute DIY project per door.
- Door sweeps: Gaps under exterior doors are common and significant. An adjustable door sweep (around $20—$40 at hardware stores) slides onto the door bottom and seals the gap against the threshold.
- Window caulk: Inspect where window frames meet the exterior siding. Cracked or missing caulk allows air infiltration along the full perimeter of every window. Re-caulking with exterior silicone caulk is a low-cost, high-impact DIY task.
- Electrical outlets and switches on exterior walls: These are a surprisingly significant source of air infiltration. Foam gaskets (sold for less than $5 for a pack of 10) installed behind the cover plates block cold air moving through the wall cavity.
- Attic hatch or pull-down stairs: The attic hatch is often the largest unsealed opening in a home's thermal envelope. An insulated attic hatch cover kit dramatically reduces heat loss through this opening.
8. Check Your Emergency Heat Source
Fall is the time to prepare your backup plan for what happens if the furnace fails on the coldest night of the year. Having a tested, ready backup prevents a breakdown from becoming a dangerous emergency:
- Electric space heaters: Test each unit now to confirm it heats properly. Check the power cord for any fraying or damage. Keep them away from anything flammable by at least 3 feet, and never plug a space heater into an extension cord — space heaters draw high current and extension cords cause fires.
- Wood-burning fireplace: Have the chimney inspected and swept by a certified chimney sweep before the first use each season. A chimney with creosote buildup or a bird nest is a fire and CO hazard. Verify the damper opens and closes fully.
- Gas fireplace insert: Test the ignition and confirm the glass door seals properly. Have the flue inspected if it has not been checked in the past year.
- Never use: Gas ovens, outdoor propane or charcoal grills, camp stoves, or portable generators indoors or in a garage. All produce carbon monoxide at concentrations that can be lethal within minutes in an enclosed space. There are no exceptions.
9. Know Your Shutoff Locations
The middle of a heating emergency — in the dark, in the cold, under stress — is not the time to learn where your gas shutoff is. Spend 10 minutes now locating, verifying, and labeling each of these:
- Gas shutoff valve at the furnace: Located on the gas supply pipe within a few feet of the furnace. A ball valve (handle inline with pipe = on; handle perpendicular = off) or a plug-style cock valve (slotted head in-line = on; perpendicular = off). Label it with a tag.
- Main gas shutoff at the meter: Outside at the gas meter. This valve requires a wrench to turn. Turning it off stops gas to the entire house. If you smell gas in the home, this is the one to use.
- Furnace electrical disconnect switch: Usually a standard light-switch-style disconnect mounted on or near the furnace or air handler. Locate and label it in your breaker panel as well.
- Main water shutoff: If the furnace fails during a freeze and you cannot stay in the home or find heat quickly, shutting off the main water valve and draining the pipes prevents burst pipes — which can cost $5,000—$70,000 in water damage depending on how long the water runs.
How Much Does Fall HVAC Prep Cost?
| Task | DIY Cost | Pro Cost | Notes |
|---|---|---|---|
| Furnace tune-up / inspection | ✓ | $80 — $200 | Includes combustion analysis and heat exchanger check |
| Air filter (pleated MERV 8–11) | $10 — $30 | ✓ | Replace at tune-up and every 60–90 days through winter |
| CO detector replacement | $20 — $60 per unit | ✓ | Replace entire unit if over 7 years old |
| Weatherstripping (per door) | $10 — $30 | ✓ | Self-adhesive foam; easy DIY |
| Door sweep (per door) | $15 — $40 | ✓ | Adjustable aluminum sweep |
| Window re-caulking | $5 — $15 per tube | $100 — $300 | Silicone exterior caulk; DIY is sufficient for most homeowners |
| Duct sealing (minor leaks) | $10 — $30 (foil tape) | $300 — $1,000+ | Minor gaps: DIY with foil tape; extensive leaks: professional duct sealing |
| Humidifier water panel replacement | $10 — $30 | ✓ | Replace every fall; 15-minute task |
| Chimney inspection and sweep | ✓ | $150 — $350 | Annual recommendation for wood-burning fireplaces |
Connect with a local independent HVAC provider before the heating season rush.
Call Now — (844) 582-1795Disclosure: We are a referral service and may receive compensation for qualified calls. Calls may be routed to an independent provider network and may be recorded. Pricing and availability vary by provider and location.
When Fall Prep Reveals a Bigger Problem
If a fall inspection reveals a confirmed cracked heat exchanger, a disconnected flue pipe, or CO readings above background levels — do not operate the furnace until these are repaired. Use space heaters and extra blankets as a temporary measure. A compromised furnace is a CO risk to your entire household.
Igniter showing high resistance / unusual flame color (yellow or orange instead of blue) / thermostat not communicating with the furnace / the last inspection was more than 12 months ago. These issues warrant a professional visit before winter but are not immediately dangerous if the furnace is not yet running.
With fall prep complete, your next layer of protection is winter-specific — our HVAC winter storm preparedness guide covers freeze protection, power outage backup heating, and what to do when extreme cold hits your home.
Frequently Asked Questions
Schedule in September or early October — well before the first freeze. Once overnight temperatures drop into the 40s and 30s, HVAC companies experience a surge in calls and appointment availability shrinks. Emergency service fees also increase during peak demand. Booking early typically means shorter wait times, lower rates, and the ability to address any discovered issues before cold weather arrives.
Skipping increases the risk of a breakdown during the coldest weather — exactly when repair technicians are hardest to reach and emergency fees are highest. More importantly, a cracked heat exchanger or blocked flue vent that goes uninspected can leak carbon monoxide into your home throughout the heating season. Annual inspections catch these issues before they become dangerous or expensive.
A partial top cover to deflect falling debris and ice is fine for a standard central AC condenser in winter (when it is not operating). However, never fully enclose the unit — moisture trapped inside promotes corrosion. If you have a heat pump, do not cover it at all; heat pumps run in winter and need full airflow. Leaves and debris should be cleared from around the unit, but the unit itself is designed to handle winter weather.
The gas shutoff for your furnace is typically a ball valve or a round handle valve on the gas supply pipe within a few feet of the furnace. Ball valves are off when the handle is perpendicular (90—) to the pipe; on when parallel. If you cannot locate it, your gas utility company can help identify it during a non-emergency visit. Locate and label all shutoffs before you need them — not during an emergency.
The U.S. Department of Energy recommends 68°F when you are home and awake, and lowering it 7–10°F when asleep or away. This can reduce annual heating costs by roughly 10%. Do not let indoor temperatures drop below 55°F even when away — at lower temperatures, pipes in exterior walls can freeze. Smart thermostats automate these adjustments without sacrificing comfort.
First check the basics: confirm the thermostat is set to Heat mode, the set temperature is above the current room temperature, and the furnace power switch is on. Check the air filter — a severely clogged filter can cause a high-limit trip shutdown. Check your circuit breaker. If none of these resolve it, call for service. A no-heat issue discovered in fall, when technicians are available and demand is lower, is far easier and cheaper to address than one discovered on a freezing December night.
Connect with a local independent HVAC provider before heating season demand peaks.
Call Now — (844) 582-1795Disclosure: We are a referral service and may receive compensation for qualified calls. Calls may be routed to an independent provider network and may be recorded. Pricing and availability vary by provider and location.
Local HVAC Service Areas
Cool Call Pro connects homeowners with independent HVAC technicians nationwide. Find a pro in Boston (MA), Detroit (MI), Milwaukee (WI), or your city. Browse state HVAC guides: Massachusetts, Michigan, and Wisconsin.
