Advertising Disclosure: This site may receive compensation for service connections made through this page. Content is editorially independent.
A routine HVAC service call runs 45 to 60 minutes and follows a defined sequence: visual inspection of the outdoor and indoor units, electrical tests on the capacitor / contactor / motor windings, refrigerant pressure and temperature-split measurement, and a written diagnosis. The $65 to $150 diagnostic fee (per our cost guide) buys you the technician's time, the eyes-on inspection sequence, and the diagnosis — not the repair itself, which is quoted and authorized separately. Knowing what each step is for makes you a better customer: you can tell competent diagnosis from upselling, you can ask the right questions when the tech calls you with a repair quote, and you can frame the cost as a measurement service rather than an opaque fee.
You Booked a Service Call. What's the Tech Going to Do?
You called because something is wrong — maybe the AC stopped cooling, maybe the furnace is short-cycling, maybe the new homeowner inspection your real-estate agent recommended. A technician will show up in a service truck, spend somewhere between 45 minutes and an hour at your home, and hand you a written diagnosis with a repair recommendation. What is actually happening during that hour?
This article walks through the routine sequence a competent technician follows on a residential service call. It is not a DIY guide — every action described is technician work governed by federal certification and the safety realities of working on a system that carries 240V at the disconnect, refrigerant under 250+ psi, and a capacitor that holds a lethal charge for minutes after power is cut. It is, instead, a transparency guide: knowing what the tech is doing for your money makes you a better customer when they come back to you with a quote. If the tech is shortcutting the sequence, you'll notice. If the tech is being thorough, you can frame the bill correctly. And when the call ends with a repair recommendation, you'll be able to weigh it against the framework in our repair-or-replace decision guide rather than guessing.
Two upstream notes. First, the pricing math for the call is not in this article — diagnostic fees, after-hours surcharges, and standard hourly rates live in our cost guide and the 2026 HVAC cost pillar. This article is the technical-work companion. Second, the homeowner's pre-call DIY check is intentionally minimal — that's covered in the pre-call section below and matches the site-wide DIY cap.
Why Pay for This At All? (The Stakes If You Skip It)
Three failure modes exist when a homeowner tries to short-circuit the diagnostic step. Each costs more than the $65-$150 fee they're trying to save.
Buying the wrong repair. A central AC that won't cool can be caused by at least seven distinct failures: low refrigerant from a sealed-system leak, a failed run capacitor, a tripped float switch on a clogged drain, a dirty evaporator coil restricting airflow, a failed contactor, a blown control board, or a stuck reversing valve on a heat-pump in cooling mode. All seven present with the same homeowner-visible symptom — "the air coming out isn't cold." A homeowner who skips the diagnostic and orders a "refrigerant recharge" online (which is illegal for an uncertified person to perform under EPA Section 608) buys a recharge for a system whose actual problem is a $40 capacitor. The capacitor still fails the next day, and the new refrigerant leaks out within months.
Missing a secondary failure. A capacitor doesn't usually fail because it got old in isolation — it fails because the compressor is drawing higher amperage than the capacitor was sized for, which is a symptom of a different problem (compressor wear, condenser-fan motor wear, low refrigerant raising amp draw). A technician who replaces a capacitor without measuring the compressor amp draw and the suction-line temperature is replacing the most-visible part without diagnosing the underlying cause. A homeowner doing it themselves has no diagnostic at all, and the new capacitor fails on the same cycle that killed the first one. The U.S. Department of Energy's residential HVAC maintenance guidance frames this exact pattern: the catchable failure is the symptom; the diagnosable failure is the cause; only the cause stops the recurrence.
Voiding warranties or breaking sealed-system seals. Most residential HVAC manufacturer warranties require service by a qualified contractor following ACCA technical standards. A homeowner who opens the sealed refrigerant loop — even to "just check the pressure" — voids the system warranty and, on R-454B systems being deployed in 2026 under the EPA AIM Act refrigerant transition, breaks the A2L safety chain. The diagnostic fee is the cost of having a credentialed technician put eyes on the system without breaking the warranty.
What You Can Safely Do Before the Tech Arrives
A short list of safe homeowner actions exists, and it stops there. Do these before the call so you don't pay a diagnostic fee for a problem you could have fixed yourself in two minutes:
- Check that your air filter isn't the problem. A clogged filter restricts airflow, freezes the coil, and presents as "the AC isn't cooling." Replace it with a clean one (MERV 8 to 11 is fine for most homes) and run the system for an hour before deciding to call.
- Verify the thermostat setting. Make sure it's in COOL or HEAT mode (not OFF or eco/away), the setpoint is at least 3°F away from the current room temperature, and the batteries aren't dead if it's battery-powered.
- Clear physical debris from around the outdoor unit. Leaves, grass clippings, or a pile of mulch within 2 feet of the condenser restricts airflow. Move the debris back without touching the unit itself or running anything against the fins.
- Flush the condensate drain line with a half-cup of white vinegar. A clogged drain trips the float switch, which in turn shuts off the AC. The flush is done at the indoor cleanout (the capped PVC pipe near the air handler).
That is the full safe homeowner list. Do not open any electrical panel, do not touch the capacitor or contactor, do not test voltage, do not jumper any safety switch, do not add or recover refrigerant, do not pull the disconnect at the outdoor unit. Each of those actions is technician work, and the consequences for a homeowner getting any of them wrong range from a destroyed compressor to a fatal capacitor discharge to a federal Section 608 violation. The site-wide safety page covers the boundary in more detail.
If the four checks above don't restore operation, book the call. The diagnostic fee is what comes next, and the next five sections are what your fee buys.
Connect with an independent HVAC technician in your area to walk through the diagnostic in person.
Call Now — (844) 582-1795Disclosure: We are a referral service and may receive compensation for qualified calls. Calls may be routed to an independent provider network and may be recorded. Pricing and availability vary by provider and location.
The Routine Service Call, Step by Step
A competent technician follows a roughly fixed sequence on a residential service call. The sequence is standardized by trade-association practice — the ACCA technical standards and the routine items in ENERGY STAR's HVAC maintenance guidance — and varies modestly by service-call type (no-cool diagnostic vs. seasonal tune-up vs. follow-up on a known fault). What follows is the routine no-cool / no-heat diagnostic structure.
1. Arrival and homeowner interview (5 to 10 minutes)
Before touching the system, the technician asks the homeowner to describe the symptom, when it started, what's been tried, and any recent triggers (a thunderstorm, a power outage, a thermostat change). This isn't filler — the interview narrows the diagnostic from "all possible causes" to "two or three likely candidates," which determines which tests get run first. A tech who skips the interview and walks straight to the unit is either very experienced and recognizing a pattern, or rushing.
2. Indoor inspection: thermostat, filter, air handler, drain line (10 to 15 minutes)
The technician verifies the thermostat is calling for cooling (or heating) — confirming the request is reaching the equipment. The air filter is pulled and inspected; a coated or clogged filter is logged as a contributing cause. At the air handler, the tech opens the access panel (technician work — the panel sometimes carries a safety switch that cuts power, and there is high-voltage wiring inside) and looks at the evaporator coil, blower wheel, and electrical connections. The condensate drain line gets a visual check at the trap and the float switch. Frost on the evaporator coil, a slipping blower belt (on older units), or scorched wiring at the contactor are common findings here.
3. Outdoor unit visual inspection (5 minutes)
The technician walks around the condenser, checking for bent fins, debris in the coil, an unlevel pad, signs of refrigerant leak (oily residue on the line set or service valves), and the condition of the disconnect. The data plate is photographed for the model and serial number — important for parts ordering and warranty lookup, and required for ENERGY STAR rebate verification on newer systems.
4. Electrical sequence: capacitor, contactor, motor windings (10 to 15 minutes)
This is the heart of the diagnostic on most no-cool / no-heat calls. With the disconnect pulled and the capacitor properly discharged (technician work — the lethal-charge risk is real), the tech measures:
- Run-capacitor microfarad reading vs. the data-plate rating. A capacitor whose measured µF is more than 6% below the rated value is failing and is the cause on a meaningful share of summer no-cool calls.
- Contactor condition. Pitting, welding, or excessive carbon on the contacts indicates electrical wear; the contactor is checked for proper pull-in voltage.
- Compressor and fan-motor winding resistance. Each winding (start, run, common) is measured with a multimeter — open or shorted windings are the diagnostic for a failed motor.
- Amp draw under load. Once power is restored and the system runs, the tech clamps an ammeter on the compressor and fan-motor leads to compare actual draw against rated. High amp draw on the compressor suggests early wear; high amp draw on the fan motor often means bearing failure or restricted airflow.
The electrical sequence produces specific numbers a competent tech will share — "your capacitor reads 32 microfarads on a 45 rating," "your compressor pulls 18 amps under a 16-amp rated load." Vague language like "the electrical side looks rough" without numbers is a sign the sequence wasn't actually run.
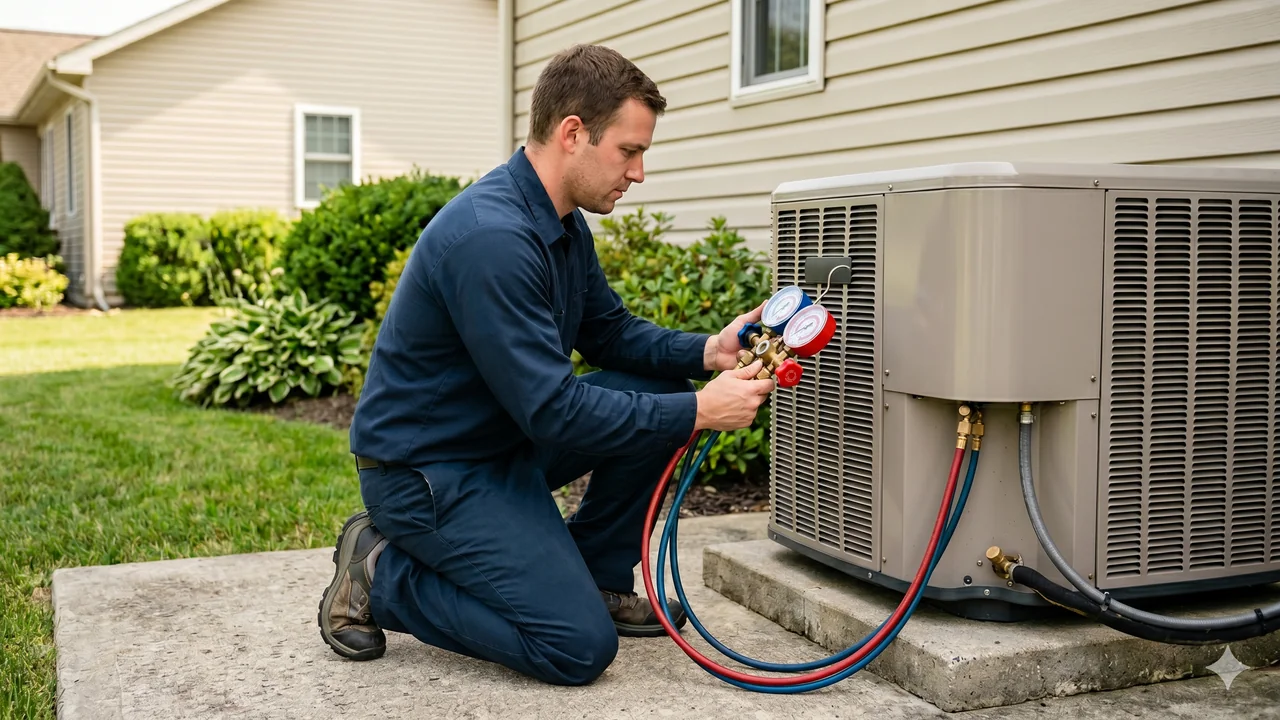
5. Refrigerant cycle: pressures, superheat, subcool, temperature split (10 to 15 minutes)
On a sealed-system diagnostic, the technician connects a manifold gauge set to the service ports — technician work governed by EPA Section 608 certification, since opening the service ports is regulated refrigerant work. Once connected, the readings include:
- High-side and low-side pressure compared against the manufacturer's published pressure-temperature chart for the outdoor temperature and refrigerant type (R-410A on most systems through 2025; R-454B on new installations starting 2025 under the AIM Act).
- Superheat on the suction line (calculated from the low-side pressure and the line temperature) — confirms the metering device is feeding refrigerant correctly.
- Subcool on the liquid line — confirms the condenser is releasing heat correctly and is the key diagnostic for refrigerant charge.
- Indoor temperature split across the evaporator coil — the difference between return-air temperature and supply-air temperature, expected at 15-20°F on a properly charged system in cooling mode. A 6-8°F split with good airflow is the classic low-refrigerant signature.
The refrigerant readings are where most "you need a recharge" upsell happens. A competent tech does not recharge based on pressure alone — they confirm the charge call with subcool and temperature split, and they look for the source of the loss before adding refrigerant. Refrigerant in a sealed loop does not "use itself up" — if the charge is low, the system has a leak, and the leak needs to be found and repaired before topping off. A tech who recharges without leak-searching is selling you the same recharge again next year.
6. Diagnosis, written estimate, and homeowner debrief (10 minutes)
The technician closes the call with a written or in-app diagnosis listing the findings, the recommended repair, the parts and labor breakdown, and the warranty terms for the repair. On a no-cool call this might read: "Run capacitor failed at 32µF vs. 45µF rating. Replace dual-run capacitor, $190 parts + labor. 90-day workmanship warranty, manufacturer warranty on the part per the parts supplier." On a leak-finding call the estimate is structured differently — leak-search labor, the repair labor, and the refrigerant recharge after the repair is verified.
How to Spot a Competent Diagnostic vs. an Upsell
Three patterns reliably separate honest diagnosis from upselling, and a homeowner who knows them goes into the post-diagnostic conversation with leverage rather than anxiety.
Specific measurements tied to specific repairs. A tech who recommends a capacitor replacement should be able to tell you the measured microfarad reading and the rated reading. A tech who recommends a refrigerant recharge should be able to tell you the high-side pressure, low-side pressure, subcool, and temperature split. A tech who recommends a coil cleaning should be able to point at a coated coil. If the recommendation comes without a measurement, ask for the measurement — competent techs welcome the question because the measurements justify their work.
Repair-first framing on systems under 10 years. Most residential HVAC manufacturer warranties cover compressors for 5 to 10 years and other parts for 5 years from registration, and the system itself is generally serviceable for 12 to 18 years. A tech who walks into a 6-year-old system and recommends full replacement after a $400 capacitor failure is upselling. A tech who runs the repair-or-replace decision math — repair cost vs. equipment age vs. expected remaining life — is doing the work honestly. Both come up in real-world calls; the framing tells you which.
A clean separation between the diagnostic fee and the repair authorization. The diagnostic fee is for the inspection and the diagnosis. The repair is a separate decision the homeowner authorizes after seeing the quote. A tech who tries to start the repair without an authorization step is rushing past the consent gate. A reasonable boundary: "I diagnosed the capacitor — here's the quote — yes or no to the replacement, and we proceed from there." When a service-call quote rolls the diagnostic fee plus parts plus labor into a single number without breakdown, ask for the breakdown.
When You're Ready to Book: What to Tell the Dispatcher
The most efficient service-call booking takes about 3 minutes if you have five items ready before the dispatcher answers: the system type and approximate age, the brand and model from the data plate if you can see it, the symptom in plain language (not "it's broken" — "the outdoor unit hums but doesn't start" is much more useful), when the symptom started, and whether anyone vulnerable to temperature extremes (infant, elderly, medical condition) is in the home. Five items, three minutes, and the dispatcher routes the right technician with the right parts.
Climate context: in cold-climate metros like Hartford, Connecticut and Portland, Maine, winter no-heat service calls dominate, and the sequence above is run on a furnace or heat-pump rather than central AC — but the structure is identical (visual, electrical, combustion-or-refrigerant, debrief). In mixed-humid metros like St. Louis, Missouri, both seasons generate calls. In hot-dry metros like Fresno, California, summer AC service calls drive most of the year's volume. The sequence travels.
For the broader maintenance picture — what should be inspected on a routine seasonal tune-up vs. a no-cool diagnostic, when each is appropriate, and how the two relate — see our year-round HVAC maintenance playbook. For the symptom-side companion (when the no-cool diagnostic is the right service call to book), see our complete AC troubleshooting guide. For the cost side, our cost guide and the 2026 HVAC cost pillar cover diagnostic-fee ranges, after-hours surcharges, and what a fair quote looks like.
Trusted Industry Sources
The diagnostic-sequence and certification claims in this article are consistent with published guidance from:
- EPA — Section 608 Technician Certification
- EPA — AIM Act (refrigerant transition)
- U.S. Department of Energy — Maintaining Your Air Conditioner
- ENERGY STAR — Clean Heating & Cooling
- ACCA — Technical Manuals
A technician can walk you through the diagnostic in person and itemize the repair before any work begins.
Call Now — (844) 582-1795Disclosure: We are a referral service and may receive compensation for qualified calls. Calls may be routed to an independent provider network and may be recorded. Pricing and availability vary by provider and location.
Frequently Asked Questions
A routine residential service call runs 45 to 60 minutes from arrival to walking back to the truck. Visual inspection of the outdoor and indoor units takes 10 to 15 minutes; the electrical test sequence on capacitor, contactor, and motor windings takes 10 to 15 minutes; refrigerant pressure and airflow measurement takes 10 to 15 minutes; the technician's write-up and homeowner debrief takes 10 minutes. A complex diagnosis (intermittent fault, refrigerant leak hunt, control-board failure) can extend the call to 90 to 120 minutes. Routine seasonal tune-ups follow the same sequence but add coil-cleaning labor and trend toward 60 to 90 minutes.
The diagnostic fee covers the technician's travel, the eyes-on inspection sequence, the electrical and refrigerant tests, and a written or verbal diagnosis with a repair recommendation. It does NOT include the parts or labor for any repair identified — those are quoted separately and the homeowner authorizes them before work begins. Our cost guide lists diagnostic fees in the $65 to $150 range nationally, with the variance driven by metro labor rates and whether the call is during business hours or after-hours. The fee is what you pay for credentialed eyes on the system; the repair is a separate decision.
Almost always no — and a contractor who quotes a major repair sight-unseen is a red flag. The diagnostic exists because HVAC failures have overlapping symptoms (a unit that won't cool can be low refrigerant, a failed capacitor, a tripped float switch, a dirty coil, or a blown control board — all five present similarly). Skipping the diagnostic means buying the wrong repair. The exception is a clearly visible failure (burned wire, ruptured capacitor, visible refrigerant leak) where a homeowner can photograph the part and a technician can confirm. Even then, the technician verifies on arrival before replacing — that verification is the diagnostic fee at work.
Five items make the call efficient and help the dispatcher route the right technician. System type (central AC, heat pump, furnace, mini-split) and approximate age. Brand and model if accessible (the data plate is on the outdoor unit or near the indoor air handler). The symptom in plain language — "the outdoor unit hums but doesn't start," "warm air from the vents," "thermostat shows no power" — better than "it's broken." When the symptom started and any recent triggers (storm, breaker reset, thermostat change). Whether anyone vulnerable (infant, elderly, medical condition) is in the home — this changes priority routing. Having these ready turns a 10-minute booking call into a 3-minute one.
Three signs separate competent diagnostic from upselling. First, the technician spends time on visual inspection and measurement before naming a repair — a tech who walks in, glances at the system, and immediately recommends a $2,000 part is short-circuiting the diagnostic. Second, the recommended repair traces to a specific measurement the tech can show you — a capacitor reading 30 microfarads when the data plate says 45, a temperature split of 8°F when it should be 15-20°F, a high-side pressure 80 psi above the manufacturer's target. Vague language like "your refrigerant is low and it needs a recharge" without a pressure reading is a warning sign. Third, the tech offers a repair-vs-replace framework rather than pushing replacement — a 7-year-old system with a $400 repair is rarely a candidate for full replacement, and an honest tech says so. See our repair-or-replace framework for the decision math.
Any technician who handles refrigerant on a sealed system — recovery, recharge, leak repair, line-set work — must hold EPA Section 608 certification. Type II is the certification for high-pressure split-system equipment (most residential central AC and heat pumps). If your service call involves refrigerant work, ask the dispatcher when you book: "will the technician on this call be Section 608 Type II certified?" A legitimate operator confirms without hedging. As of 2026 some systems are transitioning from R-410A to R-454B refrigerant under the EPA AIM Act, and R-454B is an A2L mildly flammable refrigerant — a technician working on R-454B equipment needs both Section 608 certification and the additional training and tools to handle the A2L class safely. If a tech is hesitant about an R-454B system, that's often a credentialing issue, not a problem with the system.
Local HVAC Service Areas
Cool Call Pro connects homeowners with independent HVAC technicians nationwide. Find a pro in Hartford (CT), Portland (ME), St. Louis (MO), or Fresno (CA), or browse by state: Connecticut, Maine, or all locations.